Details, details, details. The devil (AND wasted money) can be flushed down the drain if you don’t pay attention to shower details.
And when it comes to recessed shower niches there’s more to them than meets the eye. You may be asking…..
What size and shape should the niche be?
What material is best?
What type of shower niche should I choose so the installation labor costs will NOT force me to get a part time job?
And how do I want the shower niche to look, and where should it be placed?
This list of questions could go on and on.
However, the big concern usually is not the FOMO (the Fear of Missing Out) if you don’t install a niche. No, I’d argue it’s FOSU (the Fear of Screwing Up) if you pay a lot of money for the niche and it gets installed in a bad place, is too small, or worse yet it leaks behind the wall and results in the entire shower needing to be replaced (and YES, unfortunately this CAN happen).
So, how do you avoid shower niche mistakes and ensure you get the storage and style expanding shower feature which gives you the shower you always wished for? Read the 13 shower niche mistakes homeowners regret below with practical tips on how to avoid them with shower niche ideas you’ll love.
And at the end of the article share your ‘shower niche horror stories’ or shower niche problems (although I’m hoping you don’t have any) or ask specific questions about using a niche in your shower which are blowing your mind.
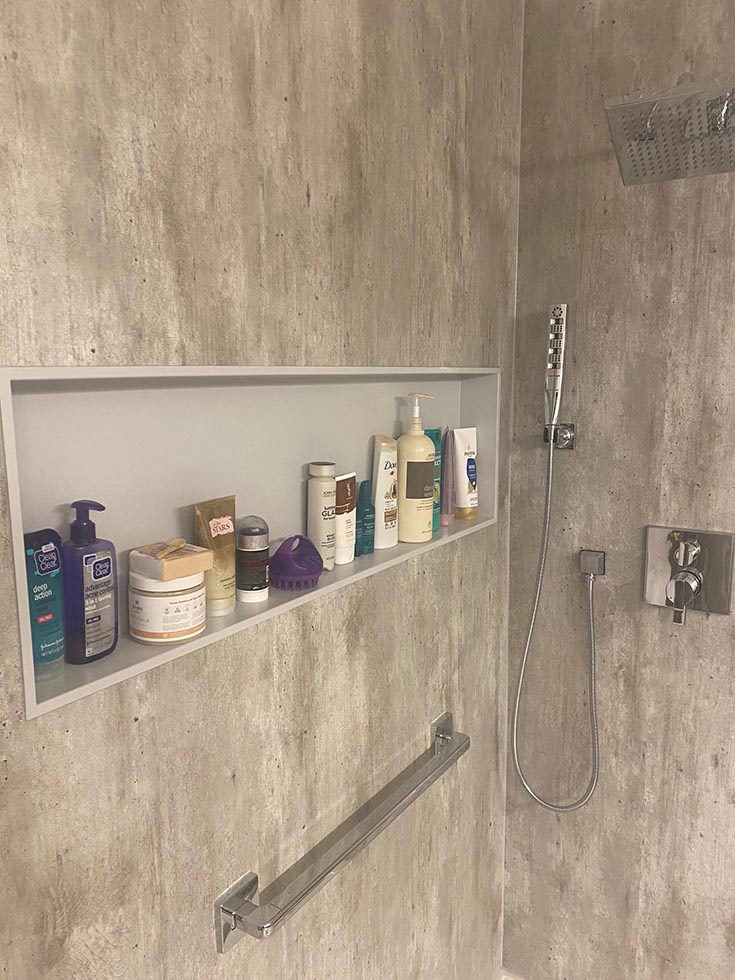
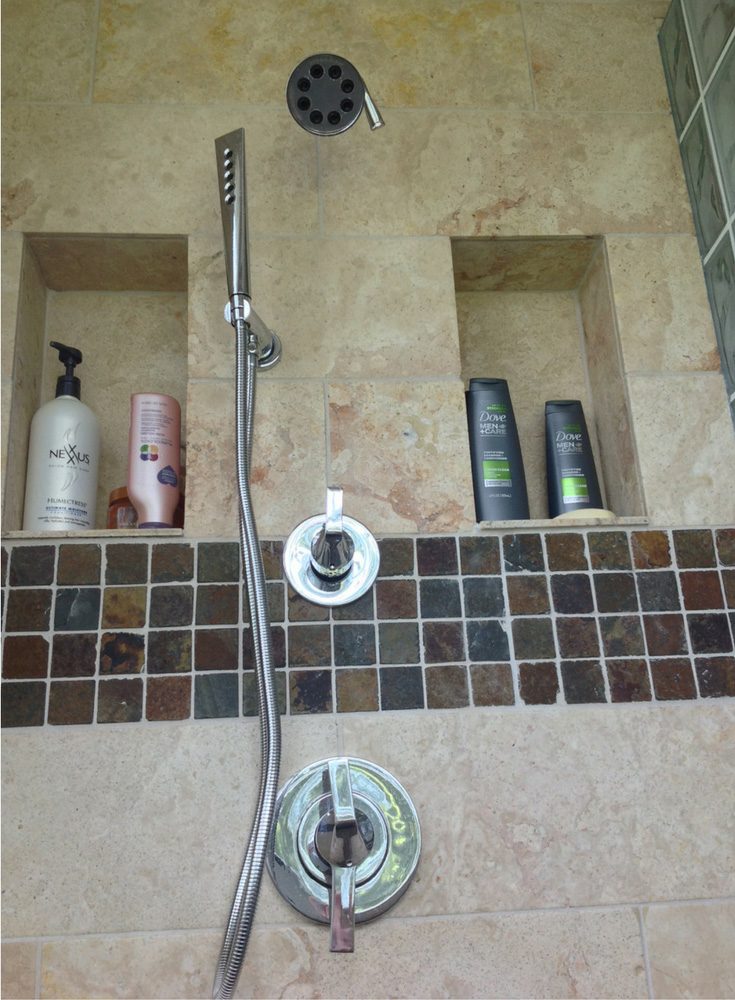
Shower niche mistake #1 – You make your niche too small
Just like your closet, I’ll bet you a ‘dollar to donuts’ (and yes, this is a weird phrase,) you aren’t saying, “Wow, I have waaaay too much storage in my shower!”
No, many showers (or existing tub/shower combos) have pathetic storage ledges where the shampoo bottles fall off with the slightest brush of your elbow. Or you’re forced to add a tacky plastic ‘dollar-store-esque’ shower caddy to ‘retrofit’ your shower for more storage. Or you put oozing bottles of liquids on the floor (an accident waiting to happen) because you have no other options.
So, how can you make sure your new niche isn’t too small and you don’t have to resort to bad (or unsafe) shower storage strategies?
Tips to avoid mistake #1 – the shower niche which is too small
Place your accessories in a row. Measure their total width and height of the tallest bottles.
Whether you use a square, horizontal, or vertical niche make sure there’s enough height for the tallest bottle (with an inch or two to spare).
Make sure your shower niche sizes are deep enough (but not too deep). Usually a 3 ½” depth (which is common with a 2 x 4 wall) will work fine. And note if you’re creating a tile niche – and it’s too deep – it’ll be prone to mold growth in the deeper, darker corners.
If you buy a vertical niche, make sure it’s designed with taller spaces and shelves (or better yet with adjustable shelves) which will work for tall shampoo bottles as well as bars of soap, loofas, or creams.
Shower niche mistake #2 – The niche is installed in the wrong place. It’s too high, too low, or just not right.
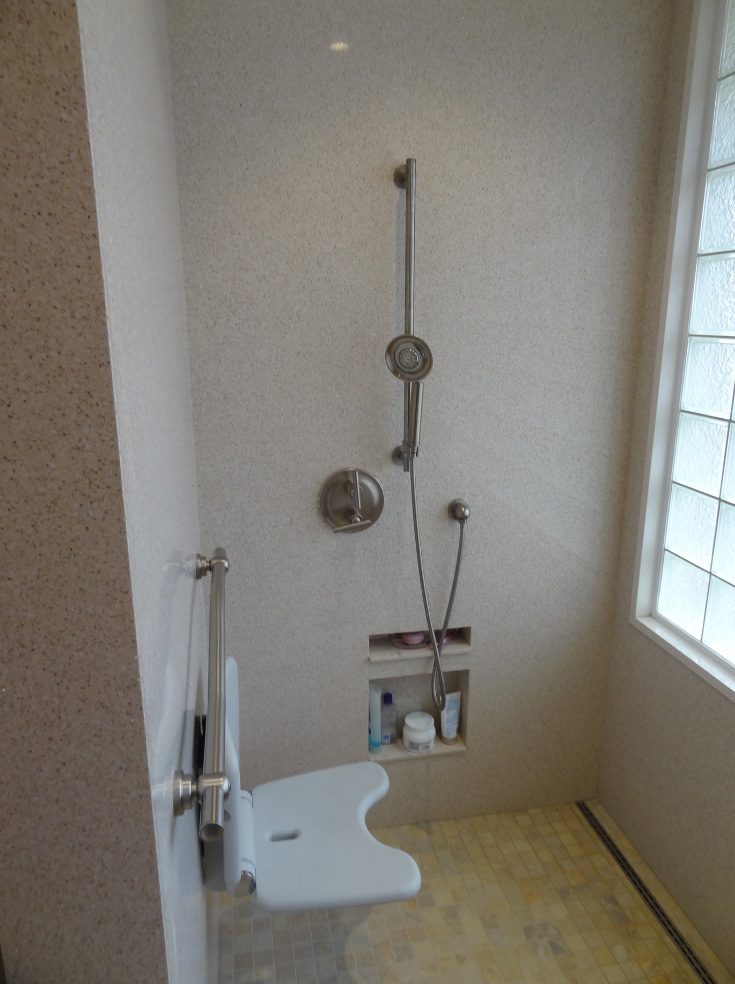
Where would you put your shower niche if your spouse is 6’5” and you use a wheelchair? This is exactly the challenge which faced my friend Rosemarie and her husband Mark.
You want niches at a comfortable height for EVERYONE using the shower. So, where should you place your shower niche so it’s best for you and others using your shower even if your heights are mismatched?
Tips to avoid mistake #2 – a shower niche which is in a bad location
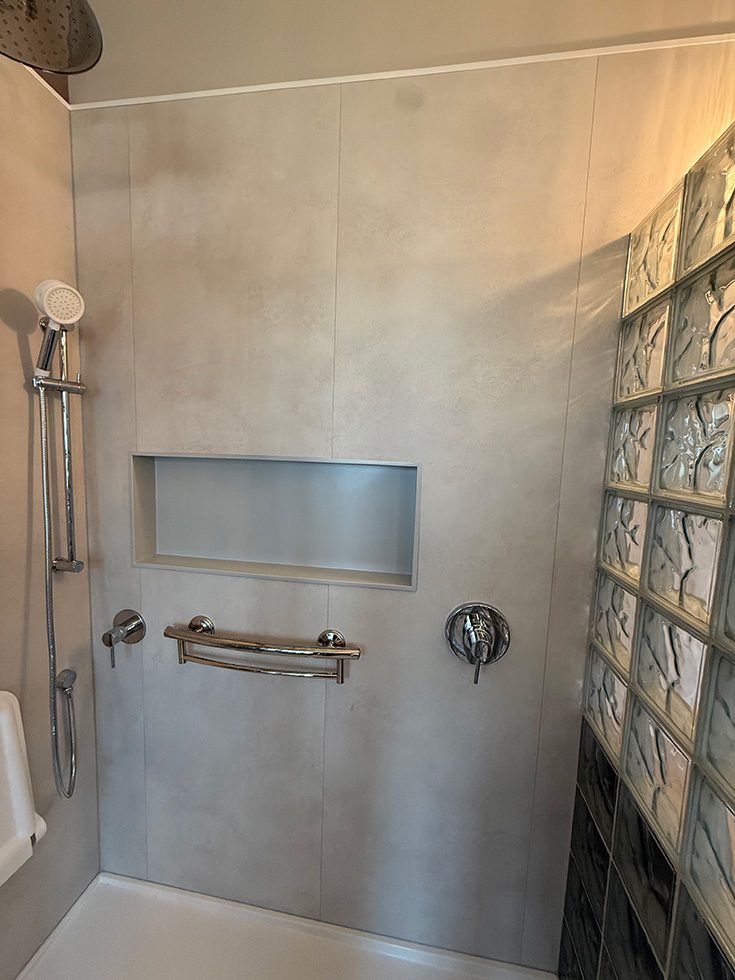
For people who stand while showering, niches should be placed 42” to 48” from the shower floor. In the case of Mark (who is 6’5” tall) he should install his niche a few inches higher.
For Rosemarie – who enters her one level shower in a wheelchair then transfers to a fold down seat it’s recommended the niche be 33” to 36” from the floor.
And lastly if you’ve got a touch (or more than a touch) of O.C.D. and ‘Symmetry-itis’ (a disease I just made up for those of us who demand their shower design look symmetric), make sure your niche is centered on the wall. Otherwise, it’ll be a ‘nails on a chalkboard’ experience for you every time you get in. Note, this will likely require reframing, and that’s code word for extra costs for you.
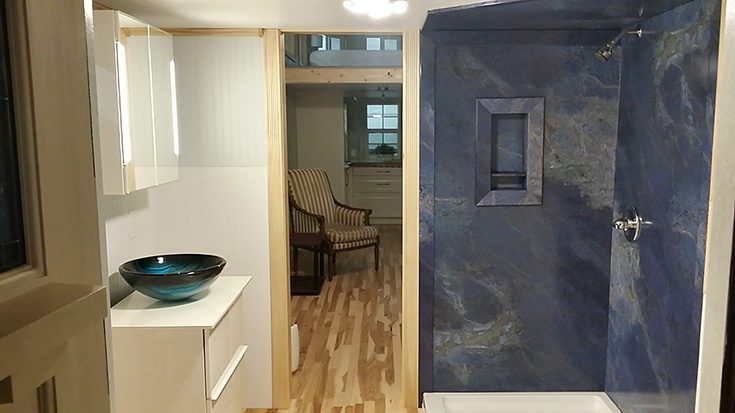
Shower niche mistake #3 – You don’t know the wide range of material choices until it’s too late
Just like any part of a new or remodeled shower, the options are more extensive than you’d think. And if you choose a tile shower niche – there’s a plethora (a fancy word I just threw in so you’d think I was smart…..is it working?) of designs you can create. However, the downside of tile niches is they’re harder to maintain (more about this in mistake #9), NOT light on your budget (more about this in mistake #13), and usually there’s often a very short installation warranty (if there’s any warranty at all).
So, what are the most common material choice options you can debate so you’re not stuck with one you hate for years to come?
Tips to avoid mistake #3 – Know your shower niche material choices
The most popular shower and bathroom niche material choices are:
Tile
Stainless steel
Solid surface
PVC or acrylic
Quartz
Natural stone
Prefabricated fiberglass niches shaped into fiberglass wall surrounds
Shower niche mistake #4 – You don’t know how much of a pain it is to install the niche until you’re too far into the process to turn back
In marketing classes it’s said ‘there’s riches in the niches’ (which are referring to market niches). However, in shower remodeling there can be a BIG LACK OF RICHES in ‘them-there’ niches! And why you may ask? It’s because your material selection, size, and shape of the niche will have a tremendous impact on not only the final cost – but also the installation challenges (and time) of putting in a niche.
So, how can you make sure ‘those shower niches’ aren’t stealing your ‘riches’ because they’re a pain to install and are causing you shower niche problems? Here’s how.
Tips to avoid mistake #4 – Making sure your niche isn’t a pain (and costly) to install
Here’s 4 ideas to save installation shower niche costs:
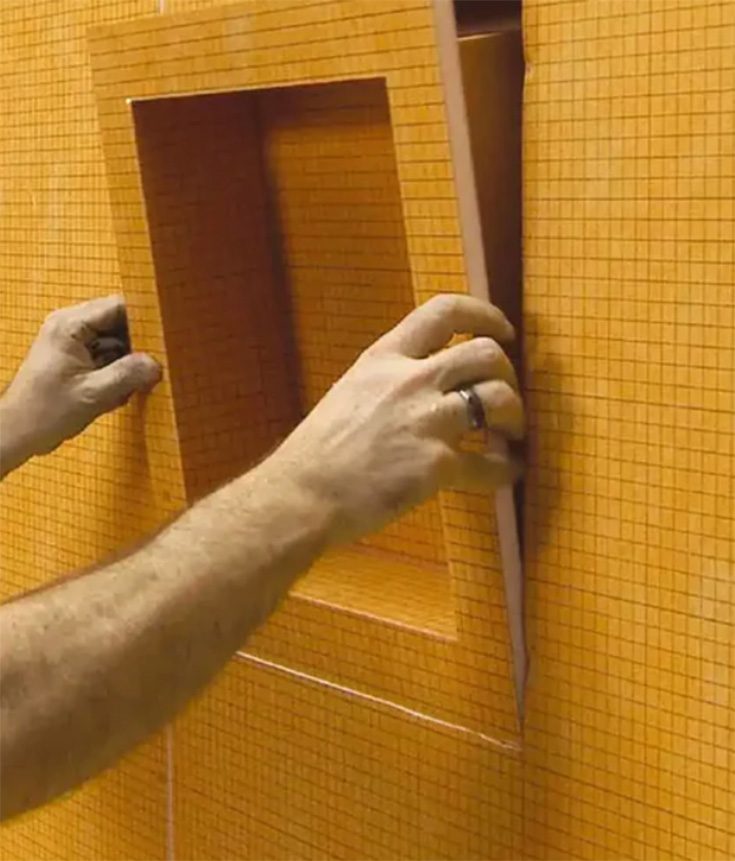
Idea #1 – DO NOT choose a tile niche. There’s a lot of time involved in tiling the niche (especially if you insist on using a fancy tile pattern like 45 degree herringbone).
Idea #2 – If your heart is set on a tile niche –reduce installation costs by purchasing a premade ‘ready for tile’ shower niche like those made by Wedi and Schluter. They’re pre-waterproofed and save installation time.
Idea #4 – Choose a niche which will NOT require reframing. These would be niches which fit inside 16” studs which include square niches or vertical niches. If you choose a long horizontal niche you’ll need to reframe.
Shower niche mistake #5 – Pooling water – or (worse yet) the leaky or moldy shower niche
Niches which pool water not only create moldy environments – but worse yet, if they’re sloped in the wrong direction you could get water behind your shower wall surrounds and need to remove the entire shower! And that’d be a DIS-AS-TER!
Fortunately – eliminating this problem doesn’t have to be complex.
Tips to avoid mistake #5 – The leaky, or moldy shower niche
If you want to eliminate worries your niche isn’t properly sloped which causes leaks or mold, purchase a premade shower niche. You can find premade niches for tile and grout free showers.
And when you get a grout free shower niche – you won’t have to worry about mold – assuming the material you choose is non-porous like a stainless steel shower niche.
And if you do choose a tile grouted niche minimize your worries about leaking by using an upgraded urethane or epoxy grout.
Shower niche mistake #6 – Putting the niche in the wrong location (or ‘living with’ a niche you have no control over)
If your niche is continually blasted with water, is hard to reach, or makes you crazy because it’s (visually) in the wrong place on the wall – this IS NOT a problem you can solve ‘after the fact.’
And in a weird way this reminds me of my mom growing up when she served us liver (which should have been considered ‘child abuse!’) and she’d say, “Michael, you’re going to eat, and you’re going to like it!” I’d think (to myself), “Mom, you CAN make me eat it – but you CANNOT make me like it!” And right now, you may be wondering, what does this story have to do with shower niche locations?
Well, if you have a bad niche location – while you won’t have to eat it, you need to know if you don’t like it, if the niche was put in the wrong location you’re NOT going to change it (just like I couldn’t change my mom’s mind about making me eat that disgusting liver!).
So, how can you solve bad shower niche location problems?
Tips to avoid mistake #6 – The bad niche location
Preplanning is the obvious solution to bad niche locations. Make sure you do the following to get the right niche by doing the following:
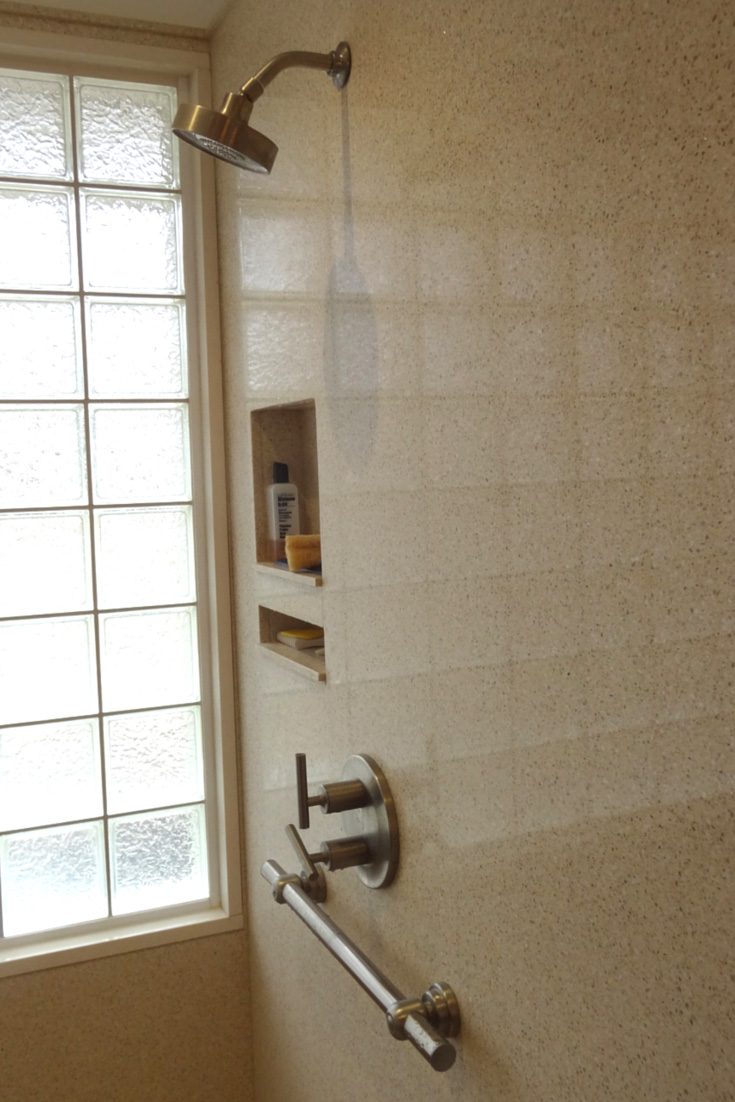
Put the niche on the side wall opposite the shower head so it won’t get drenched in water.
Make sure your niche(s) will be reachable for big people, short people, and those who want (or need) to shower – or shave in a seated position. A taller vertical niche can be used for tall AND shorter shower users alike or install two separate niches (one low and one high on the wall).
Pre-plan where your niche will go (even if you have to cut studs) to center it on the wall … if you’re a ‘symmetry person.’
Don’t buy a fiberglass preformed shower with the niches pre-built into the walls because if they’re too high, too low, too big, too shallow, or too small there’s nothing you can do about it.
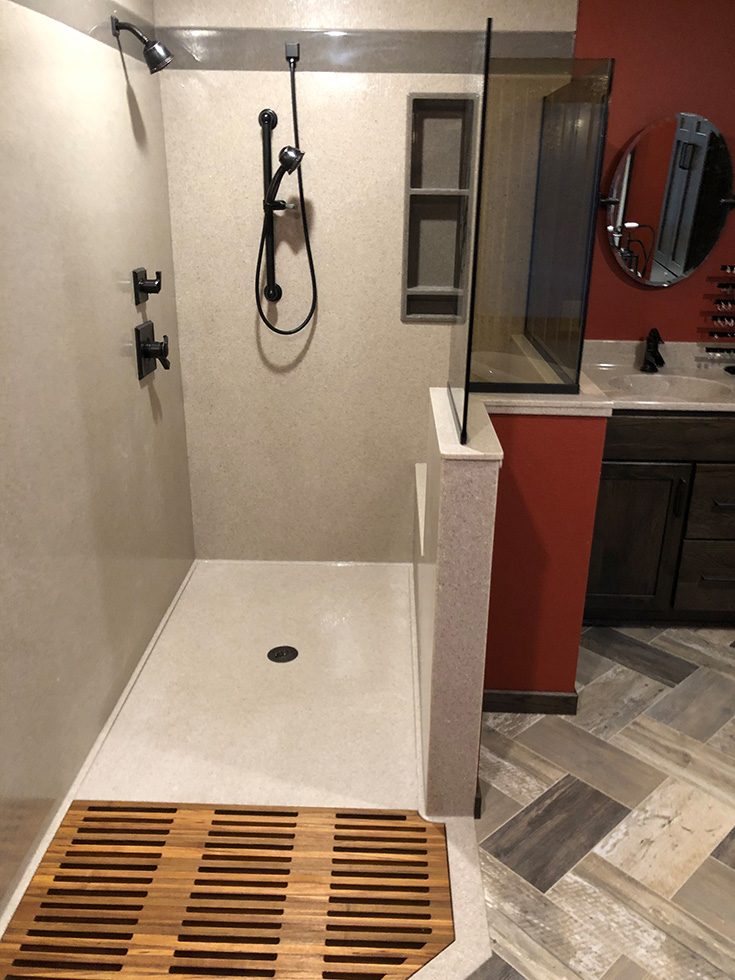
Shower niche mistake #7 – Ignoring the look of your niche
Niches can visually pop from the shower wall surrounds, or blend into the ‘woodwork’ (just an analogy here, unless you’re using a ‘wood look’ wall panel or tile, like below).
Niches can complement or contrast the shower head or shower door finishes.
Niches can work with any design style (traditional, transitional, or contemporary).
The question is what’s the right look for you. Or maybe, more importantly, what’s the right look for your spouse or partner! Here’s how to get it right the first time.
Tips to avoid mistake #7 – The niche which looks ugly, too bold, or too boring. A shower niche problem which is completely avoidable.
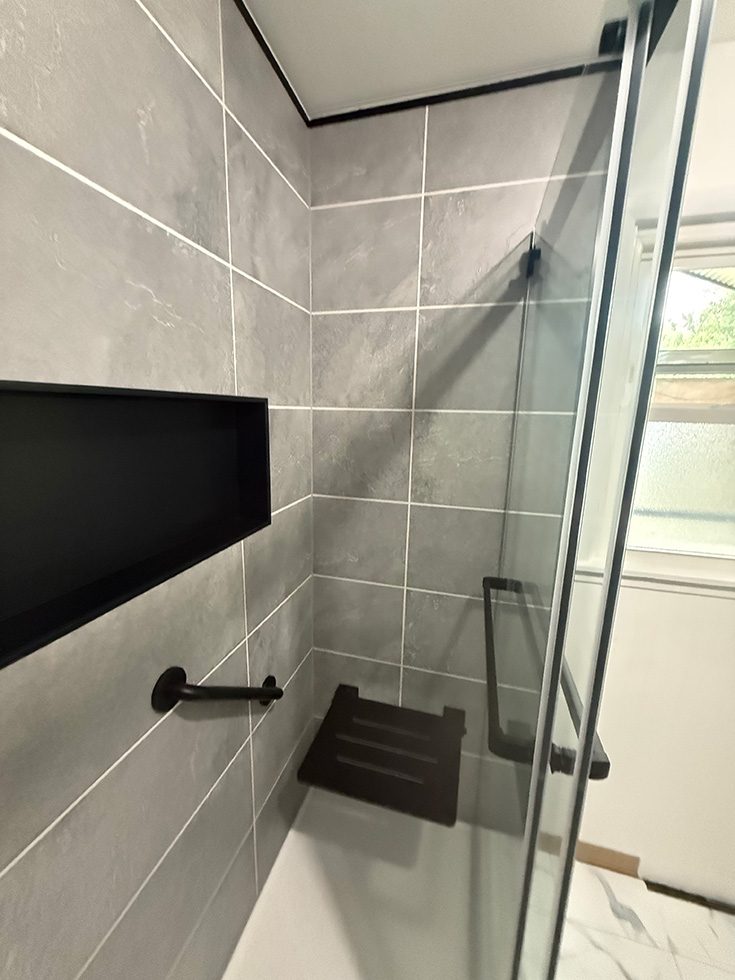
When looking at your niche think whether you want it to be a ‘focal point’ of your shower wall surrounds. If so – a matte black shower niche can make a powerful ‘statement’ when the wall surrounds are lighter colored. And yes, now I’m trying to sound like a fancy designer – hopefully, you’re buying it.
If you want your niche to ‘blend in’ – choose a pattern which is the same color/pattern as the wall surrounds.
And if you want a niche which integrates well with your shower hardware – use a popular finish like brushed nickel, chrome, or matte black. It’s MUCH trickier if you have your heart set on a trendy finish like brushed brass or champagne bronze to match finishes across manufacturers.
Also – consider the style of your bathroom when choosing a niche. A tile niche in a 45 degree herringbone pattern will give a traditional look. A brushed stainless niche with white high gloss wall panels will look modern. Niches should be chosen which ‘make sense’ with the bathroom look you want.
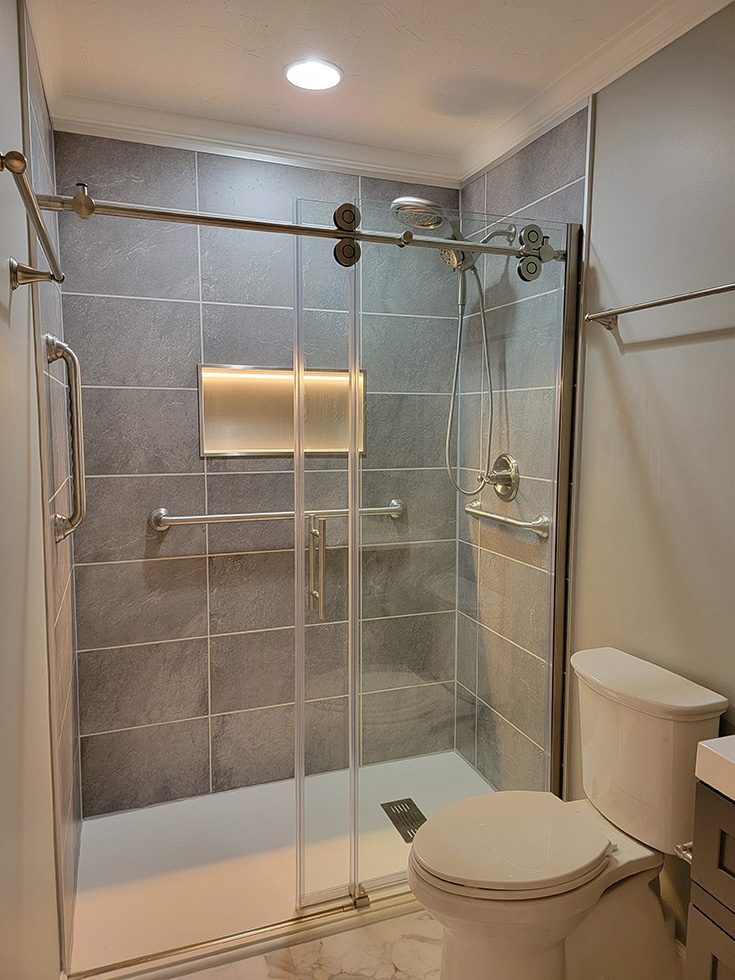
Shower niche mistake #8 – Not considering a niche which can add style AND safety
Let’s face it, showers aren’t the safest places in the world (or in your home for that matter).
And as a matter of fact, the #1 room for falls is (logically) the bathroom. Bathrooms are wet and slippery. They can be dark (especially if you don’t have a window or your existing shower walls are dark).
So, you may be wondering how a shower niche can add style and safety? Here’s how.
Tips to avoid mistake #8 – A shower which is dark and not safe
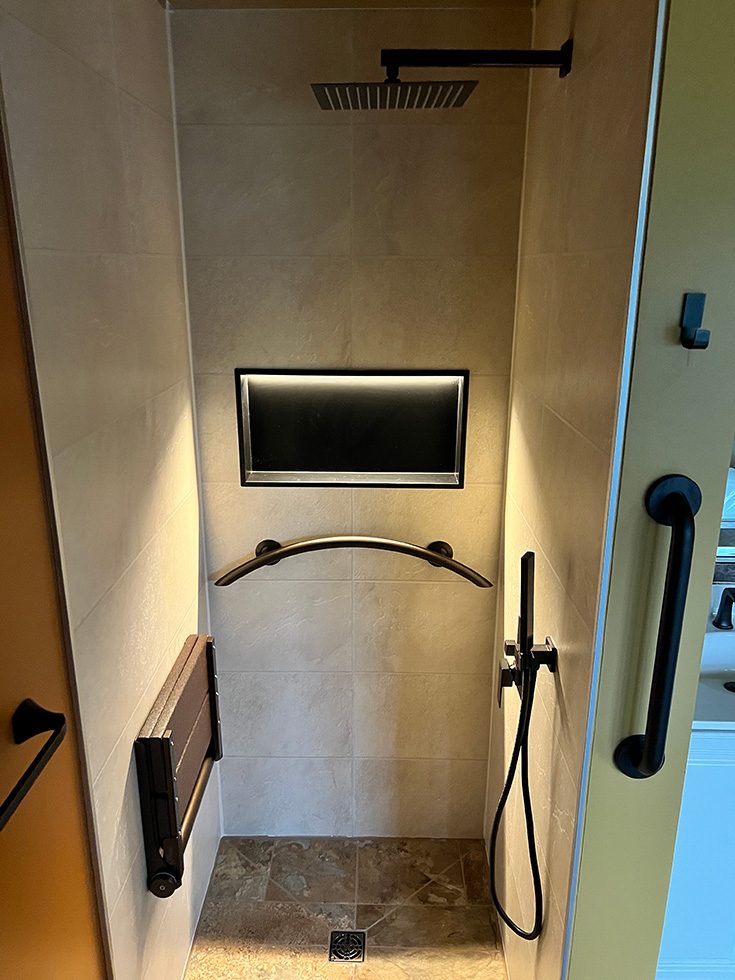
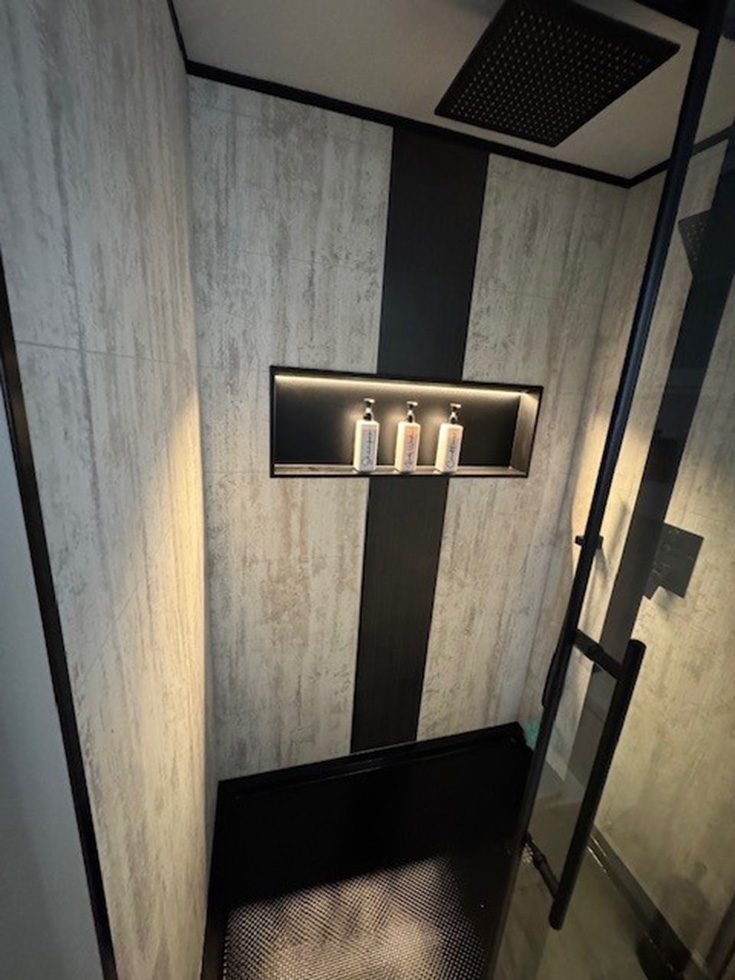
If you’ve ever seen an LED shower niche– it’s a cool feature. And if you’re designing an accessible or age in place shower (and you’re older than you wish – and I for one fall into that ‘camp’) increased lighting can lessen falls or cutting yourself while shaving.
Plus, there’s something very cool about an LED recessed shower niche, especially in the evening.
Image Credits: Honey Do Home Improvement
Shower niche mistake #9 – Not considering shower niche maintenance
If you’re the one ‘elected’ (by process of elimination) to clean the grout joints of your tile shower you may have said you’ve ‘had it up to here’ (as my mom used to say) with a grouted shower. And when you look at tile niches – and the nooks and crannies deep within extra deep niches (which don’t look – or smell anything like Mrs. Thomas English Muffins I might add) you know grout maintenance is something to be avoided (or minimized) at all costs. But how?
Tips to avoid mistake #9 – Minimizing the hassle of hard to maintain shower niches
The simplest way to minimize shower maintenance is to NOT use a tile shower niche (or if you do, use urethane or epoxy grout joints vs. sanded grout).
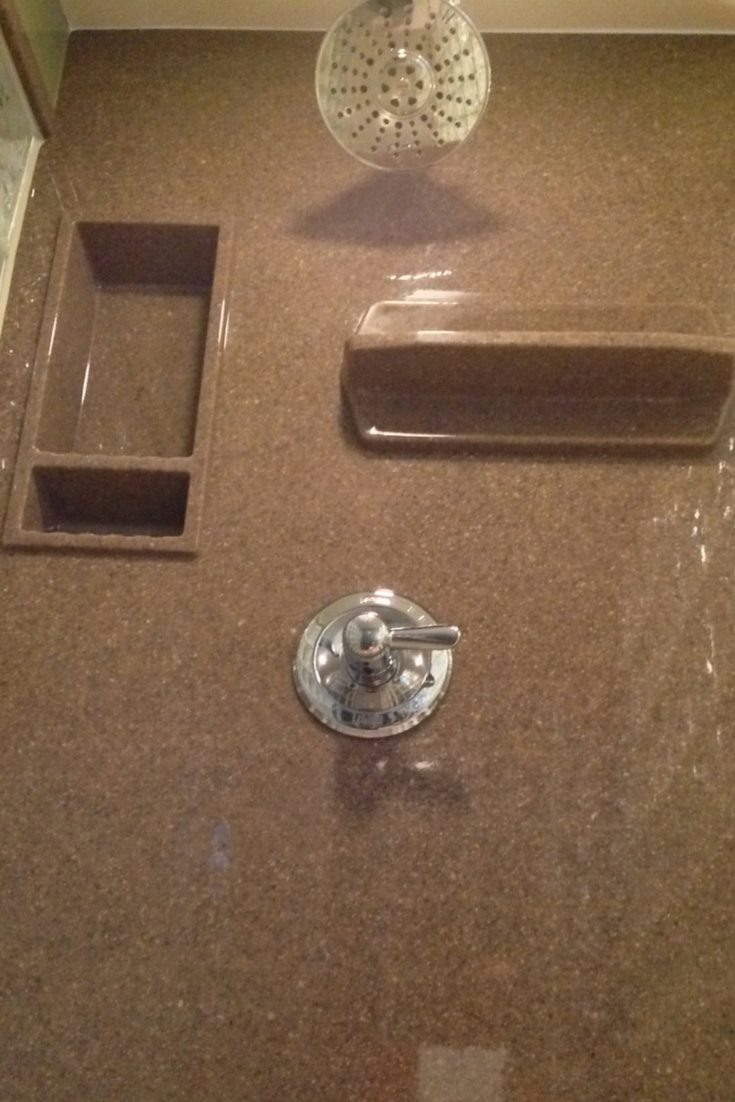
On the other hand – you’ll make life far simpler if you choose a grout free shower niche. Stainless steel niches are popular and can be made not only with a ‘metal-look’ – but also be powder coated to match white, black, gray, or other colored walls. PVC, solid surface, or cultured granite shower niches are also available in a wide variety of colors and patterns with NO (nada, zero, zilch) grout joints.
And if spots drive you crazy (other than adorable spots on a Dalmatian) then stay away from chrome niches which spot at the drop of a hat (or the drops of water from your shower head).
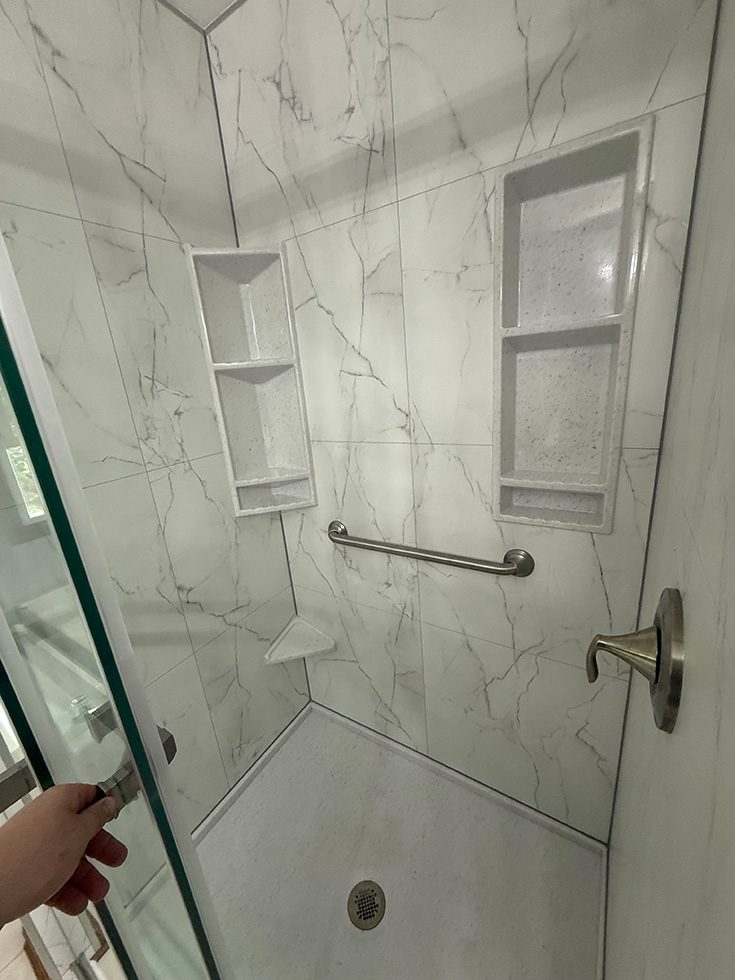
Shower niche mistake #10 – Not ‘orienting’ the shower niche to fit the size/shape of your shower
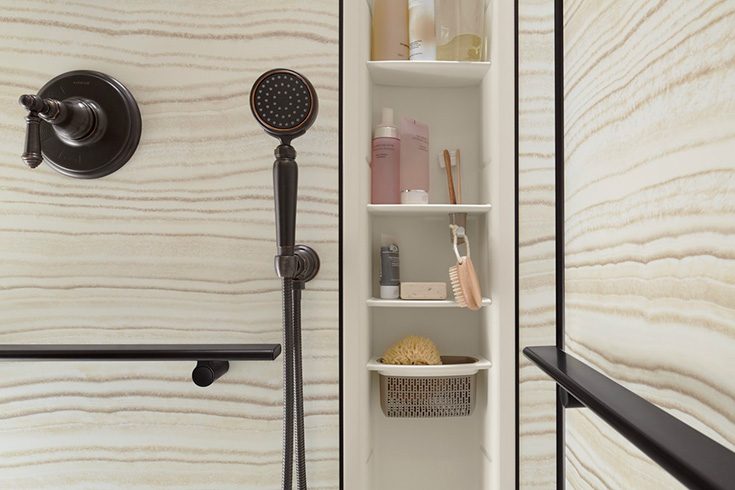
If you (or your better looking spouse or partner) needs a lot of storage – and a small square recessed shower niche just ain’t gonna cut it, you’ve likely looked at longer and taller niches (and/or corner shelves) as the answer. And it makes sense to be thoughtful which you select. And here’s what you’ll want to keep in mind deciding whether to select a taller or wider niche.
Tips to avoid mistake #10 – How to know whether to choose a taller or wider shower niche
If you’ve got a small 36” x 36” stand up shower it won’t take a rocket scientist to figure out a long horizontal recessed niche won’t work well because your wall are narrow. However, if you’ve got a match-box sized shower – but have a lot of products to store, the taller vertical recessed niche can be a godsend.
And what’s also nice about taller premade niches is they’re designed to fit inside 16” studs, don’t require reframing, and can be purchased (or built) with shelves so you don’t waste space. And a bonus storage tip could be to add a few corner shelves while you’re at it.
On the other hand if you’ve got a wide rectangular shower (let’s say you’re doing a 60” wide bathtub to shower conversion) – the long horizontal niches look cool, will hold a lot of stuff, and can be made in stainless steel sizes as long as 58.” And if you’re building a tile shower niche, they can be as long as your longest wall!
Shower niche mistake #11 – The products in your niche give you the ‘cold shoulder’ because your niche is on an outside wall
If you’ve ever (tried to) pour shampoo or conditioner from a bottle stored in your recessed niche (which was built on an exterior wall and you live in a cold-weather climate), and it comes out like a frozen daiquiri or Frosty from Wendy’s but not as tasty, you know that’s not a good thing.
And assuming you’re not installing a bar, or a fast-food take out counter in your shower (although, that’s a funny visual), you may wonder how to eliminate this problem. Here’s how.
Tips to avoid mistake #11 – Frozen – or near-frozen shower products
The simple solution is to not put the niche on the outside wall and/or to (if you have room) install insulation behind the niche or build a wall inside your exterior wall (if you have space to spare).
Shower niche mistake #12 – Not buying a shower niche which gives you ‘wiggle room’ for cutting errors
There’s nothing worse than cutting a shower wall panel too big and your recessed shower niche won’t cover the hole. Or setting up a trade show display and breaking the framework (and yes, that’s a situation I’m still flogging myself for doing this week!).
And if you’re not thoughtful about the specs of your recessed niche you end up on the ‘angry-end’ of a shower remodel which will now be more expensive (because you screwed up and need to buy more materials) and/or is delayed waiting for new materials to arrive.
So, how can you give yourself ‘wiggle room’ and minimize worrying about being as precise as an aerospace engineer when cutting backer boards and wall panels for your shower niche?
Tips to avoid mistake #12 – Avoiding the costs of mis-cuts for your shower niche
Of course, the best way to minimize cutting errors is to follow the age-old advice to measure twice and cut once, but you don’t need me to tell you that.
However, another way – specifically with niches – to minimize this problem is to buy a niche with wider ‘flanges’ around the edges which’ll give you room for (operator… ‘err installation) errors.
And while I’d love to tell you niches aren’t expensive and you don’t need to budget for them, this would only be true if you’re independently wealthy (and most of us don’t fall into this category). So, what can you do to properly budget for the niche, and aren’t caught with your (proverbial) pants down with project cost overruns? Read below for tips.
Tips to avoid mistake #13 – Making sure to budget for the costs of your shower niche (including ideas to keep your niche(s) more affordable)
If you’re not DIYing your shower, when you ask for a quote to add a niche(s) make sure your contractor quotes a complete cost for materials AND labor (unless your contractor is a family member and they’re working for free, or for a few free meals!).
And if you’re looking for tips to make sure your niche is more affordable here’s 5 ideas:
Cost saving tip #1 – Buy standard sized premade niches.
Cost-saving tip #2 – Don’t reframe the walls to fit your niche. This will mean you won’t be using large horizontal niches and may end up with niches which aren’t centered on the wall.
Cost-saving tip #3 – Don’t put the niche on the plumbing wall if it requires you to re-route pipes.
Cost-saving tip #5 – Avoid intricate tile patterns inside the niche.
Do you now feel better prepared to avoid shower niche problems? Do you need help with a shower or bathroom remodel?
I hope you found value in these 13 shower niche mistakes to make sure your niche won’t become your (expensive) problem. And if not, you can contact me for a money-back guarantee…..oops, I forgot these insights are for free, but maybe I can send you Monopoly money as a consolation prize!
And while it’s true niches are just one element of a shower – as we all know there’s a lot of ‘moving’ (and non-moving, like this niche) parts in a shower remodel.
President of Innovate Building Solutions a nationwide supplier and regional (Cleveland and Columbus) remodeling contractors. Some of our product lines include glass counters, floors, backsplashes, glass blocks and grout free shower and tub wall panels


")


")
")

